title
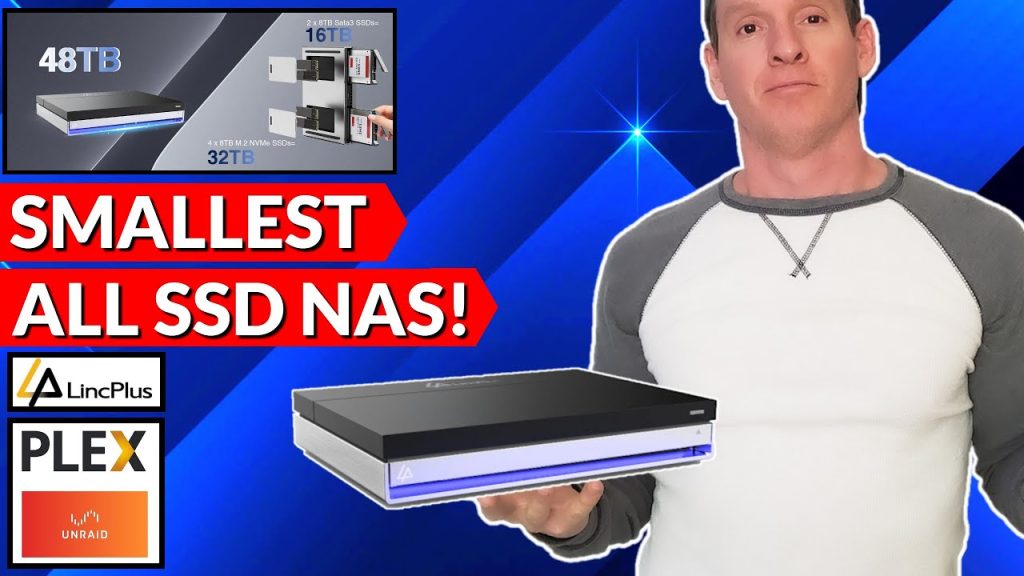
[Applause] [Music] [Applause] a few months ago we built a true n skill server on this very old and very large desktop PC and while it was a great success I've always felt it was just too large and to be honest with all these fans it's quite noisy and really ugly and I've always wanted a Nas that was small minimal and even portable So today we're going to install a much much smaller Nas so a company called link Plus reached out to me and asked me to review the LinkStation N1 the LinkStation N1 is a mini Nas that's small lightweight and even portable and even comparing the size of this box to this PC is pretty amazing so in this video I'm going to install some hard drives in the N1 and get everything set up and then we'll test all the features and we'll find out together how well the M1 performs and see if it's worth the $400 price tag the link station N1 is an all SSD Nas which means no discs the N1 one includes six Bays for ssds the front two bays are for the 2.5 SATA ssds and there are four additional Bays on the bottom of the mini Nas for the m.2 and vme ssds and both of these panel doors include heat sinks for cooling so the N1 using ssds will have faster read and right times than traditional disc drives the N1 weighs 1.7 lb and is 8 in by 6 in and is 1.5 in th stick so this mini Nas should fit in any situation and this mini Nas supports full function Docker virtualization and even includes an unraid license and we can even build virtual machines on this system and if you're feeling frisky you can install Linux windows or Android and the N1 also supports Hardware pass through so this simply means the N1 is not only a Nas but it can be a private cloud or a Home Server and that's pretty cool let's take a look at the connections on the N1 the N1 includes a 2.5 gig ethernet port and let me say that was a mistake link plus should have installed a 10 gig ethernet port if you want the fastest read and write times across your wired Network then the 2.5 gig Port is not fast enough and 10 gig ethernet ports should be the standard for all Nas and home servers just saying so hopefully link plus can upgrade this feature in the future and speaking of 10 gig the M1 does have a 10 gig USB type-c port and it also has one HDMI 2.0 as well as two USB 3.0 and also includes a 3.5 audio port the specs inside this mini Nas are pretty impressive this mini Nas comes with the Intel Celeron n5105 CPU which means four cores and also includes 16 gigs of RAM and the N1 does include Bluetooth 5.2 and Wi-Fi 6 and all of this is powered by unraid Standard Version system unfortunately Wi-Fi 6 and Bluetooth are not compatible with unraid as of now so you'll need to use a VM to use these functionalities and that's kind of a bummer the N1 Nas storage adopts unraid disc array so even if one disc is damaged it will not cause data loss and remember unraid is not a backup it's redundancy and speaking of backups the N1 supports automatic backups remote download intelligent photo albums music playback and intelligent partition so as far as the N1 goes what else comes in the Box you get a user manual with lots of information you get your power cord and your power brick and it also includes screws and a screwdriver for your SSD installation and that's it so first things first let's install a couple of ssds so we're going to buy one 2.5 SATA SSD and 1 m.2 mvme SSD and both ssds will be 4 terab so we can run this in Mirror configuration so we're going to buy two ssds on Amazon all right we're going to buy the crucial bx500 4 tbte 3D Nano 2.5 SATA SSD and the current price is $29 all right next next we're going to buy the crucial P3 4 tbte mvme m.2 SSD and this SSD is currently priced at $226 all right we'll add these to the cart and click buy and now we're going to wait for the delivery you got to be kidding me it's already here well I have to say Amazon Prime deliveries are getting faster and faster pretty cool all right let's get the ssds installed into the nas and here are both of our ssds the SATA and the m.2 mvme SSD typically I use Samsung ssds for my installs but they are a bit pricier so I decided to go with crucial instead and I have used crucial ssds before with no issues and if everything goes well with the installation and testing then I'll buy another SATA SSD and another m.2 mvme SSD so first remove the 2.5 in SATA tray from the nas so you want to place the SSD into the tray with the screw holes down and then use the provided screws and the screwdriver to secure the SSD to the tray and make sure to use all four screws and then once you're done insert the tray back into the nas installing the mvme SSD is even easier simply Slide the mvme into the slot then slide up the spring loaded bracket and push the mvme back and let go of the spring bracket now the SSD is secured and next remove the protective film from the heat sink then reattach the bottom of the door to the nas easy so now we'll connect the link station N1 to our Network and we'll use the cat 6 and plug it in to the 2.5 gig ethernet port and then next plug in the power and then turn it on and then now we'll go to our computer and then open any web browser we'll then type in tower.
Loal and now we can see the unraid web interface and first thing we'll do is change the password and make sure it's a complicated password so don't use password as password all right now we're at the unraid dashboard and this reveals everything about the N1 Nas and let's take a quick look at the tabs at the top we have main shares users settings plugins Docker VMS apps and tools so now we're going to redeem our activation code for the unraid license you'll find the activation code on the card that came inside the Box just type in the activation code and hit submit and if you don't have an unrate account you're going to have to sign up for one so sign up with an email and a password and for security reasons you'll need to verify your email that you use to sign up for the account then you can finish the activation process and the first thing you want to do is update the OS so after we update the OS I'm going to show you how to change the name of the media server so first go to settings and then identification and then you can change the server name if you want to so I'm going to change it to N1 Nas now when you you log into the server you're going to use N1 n.l instead of tower.
Loal and of course you could just leave this the way it is and not change anything but I like to be different so next we're going to assign our two drives so go down to slots and pick three next we're going to assign both drives we'll assign the mvme SSD to dis one and the 2.5 SATA SSD to the parody drive like I said before we're going to run this a mirror configuration and eventually I'll get more drives and then set this up in different rid configurations and then next we're going to create some shares like movies photos music documents and TV shows and remember in the SMB security settings under export choose yes I forgot to change this setting and I had to go back and change it later if you don't choose yes then these folders will not be available for export and we definitely want these folders available for the Plex Media Server and guys and gals if you're not subscribed to our Channel yet please do so it's completely free thanks all right we're all done with the shares so to install the Plex Media Server to the N1 Nas we need to go to the apps tab the first thing we have to do is install the community application plugin after it's installed we can look for the Plex Media Server and install it we could use jelly fin instead but I already have a lifetime Plex pass so we'll use Plex instead but jelly fin is very good and I'm going to install the Plex Pass App because I have the lifetime Plex pass okay hit install and for now I'm not going to change anything on this screen so we'll hit done and I'm going to install one more application this is unraid connect this allows users to manage Monitor and maintain their unraid server from a phone tablet laptop or PC so once this app is installed we're going to set up our Plex Media Server and start adding movies and some TV shows but first how do you add movies TV shows and music to the folders in your N1 Nas well this is how you do it and first things first you're going to need some media and if you're like me and you have a lot of movies and TV shows on your computer then this process is super easy however if you don't have any media like movies or TV shows but you have a bunch of DVDs then you can use handbrake to burn those DVDs to digital format on your computer and yes there is one more way to obtain movies TV shows and music but I'm no pirate and if I was one I wouldn't tell you anyways so let's transfer some media to the N1 Nas and we're going to start with movies so on your PC look for the network Tab and go ahead and open it and you should see your N1 Nas server so double click M1 Nas and you should see all your folders and remember if you don't see these folders then go back to the M1 Nas and make sure export is set to yes for each folder now on your computer open your media folder and we're going to drop and drag some movies into the movie folder on the M1 Nas and we have a lot of movies probably around 3,000 so this process will take a while and you can do the exact same thing with TV shows music and photos it's a simple drop and drag once all of our media is in the folders we'll go back to the M1 Nas dashboard and then we'll go to the main Tab and start performing the par operation which makes an exact copy on the parody disc and this operation will take a while then once we're done let's add submedia to the Plex server so go back to the apps Tab and go to actions and double click web UI and as you can see I already have a Plex account and if you don't have one pause the video and sign up right now now under N1 Nas go to the plus Tab and go to movies and then go next and then browse media folder then go to Media movies add and then add Library like I said before we have over 3,000 movies so this will take a while to propagate so get a cup of coffee and next I'll show you how to add TV shows so go to the plus TV shows next browse media folder media then TV shows then add and then add library and that's it and next we'll add music so go back to the plus sign then music then next then browse the media folder then look for the media and then music and then hit add and then add library and that's it once again we we have a lot of music so this will take a while to propagate so now that the N1 Nas is all set up we can now test it out by watching a movie and every TV in my house has Plex installed on it so we can watch Plex from any room in this house and that even includes outside by the pool and because I have a lifetime Plex pass I can watch my media server from anywhere in the world as long as there's mobile data or a Wi-Fi connection so the question is is the LinkStation N1 worth a $400 price tag well yes and no so let me explain if you're looking for a small and even portable mini Nas then the N1 is a solid purchase this little guy gives you up to 48 tab of storage space which is more than most people will ever need this mini Nas does run warm but not hot and there is a fan and it's silent so it's not only small lightweight and portable it also makes zero noise and the only noise that the N1 makes is when you turn it on as far as setting up the N1 Nas it's very simple and I really like the unraid interface it's very simple to use as far as the apps go they are a ton of apps to choose from and today I only scratch the surface with Plex and you can also install Jelly fin instead of Plex and both work very well as far as the downsides to the N1 there are a few things to talk about first of all you do get a free unraid license for one year but after that you're going to pay $39 a year and that's kind of a bummer it would have been nice to have a lifetime unraid license just saying and issue number two is the 2.5 gig ethernet port it's 2024 and 10 gigs should be the standard for all Nas and media servers and a 2.5 gig Port will slow you down but that's really it for any downsides to this mini Nas it's a pretty impressive mini Nas in the N1 is priced at $3.99 and that's without any drives so we're almost at $900 when you add up the N1 and the 24 TB hard drives and there is a price to be paid when you use all ssds they're quite a bit more expensive than disc drives but with this mini Nas you're going to get high performance which means faster read and WR times so my review for the N1 Nas is eight out of 10 Stars if they fix the 2.5 gig ethernet port and include a lifetime unraid license then I would have given it 10 stars but eight out of 10 stars is still very good and guys and gals the N1 product link will be in the description below and guys and gals if you want to see the fastest Wi-Fi 7 gaming router on the market check out this video right here and if you want to see our top five mesh routers check out this video right here and with that guys make sure to like share subscribe and comment and for God's sakes smash the Bell icon and I'll see you in the next video real soon high five peace


 Bengali
 Chinese (Simplified)
 English
 Hindi
Hindi Indonesian
 Irish
Irish Spanish
 Swedish
 Turkish